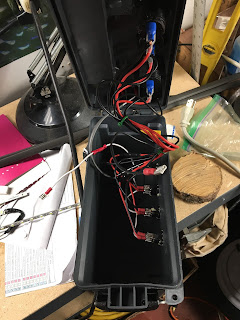
The other day I posted a picture of the first power box I made. Here is an attempt to answer all the questions I got.
Backstory: some one last year on the Ice Fishing Minnesota Facebook group posted a blurry video of a box they made and were selling. It might be the same person who has now made a bunch of the and is selling them. I like to tinker so i thought it would be fun.
There's a lot of variations. You can do it how ever you want.
The box: this is just a run of the mill plastic ammo box from Fleet Farm. You can also get them at Harbor Freight. If you catch the on sale you can get them for about six bucks. Otherwise they're around fifteen dollars.
Most of the other parts I order from Amazon. The items are hyperlinked.
The LED light bar. ($11) I picked this one because it fits nicely on the end. There are a lot of different lights available. On my second box I didn't put a light. I put it on the first one with the idea that I would run it when I am sitting up my shack. And then run my larger lights off of the box.
LED Rocker Switches (12 for $7) These aren't water proof or anything, but their cheap. They work just fine and they light up when in use.
The Charging Panel ($13) I like the charging panel. You can run a lot of phones and devices off of it, especially if you carry one of the car socket to USB adapter. I also like the voltmeter in it.
For the post terminals, I just used some screws I had already. For the terminal connectors I got a variety pack at Harbor Freight.
The difference between my first and second box is startling once you open it up.
As you might know, working with electricity is a logic puzzle. You can get it right many different ways. For some reason I felt the need to have a hub (the piece of wood in the first picture) for all of my positive and negative wires to go to. In the second one, I used jumpers between the switches eliminating the need for the hub. This also reduced the amount of wire I used by about 70%, thus reducing the clutter and mess inside.
There's also a few ways you can wire it up depending on how you're going to use it. I have the volt meter on its own switch. You might not want to do that. You could have it turn on when there's power on the unit anywhere or for a particular switch. On the first one I made I have the terminal posts and the 12v car socket on the same switch. I might rewire it and add a button.
I like having the buttons on the side so that they somewhat line up with the item it powers. On the inside, that makes it difficult to get the battery in and out. I will experiment with putting the switches in a different place for my third box.


No comments:
Post a Comment